Dual Boot OS X 10.9 Mavericks and OS X 10.8
 Setting up a dual-boot environment for OS X Mavericks and OS X 10.8 (or even 10.7 and 10.6 if you’re still running an older version of Mac OS X) is easy and allows for a fresh installation of Mavericks to test and develop with. Because the original OS X installation remains untouched, it’s also the safest way to give Mavericks a trial run, which is perfect for running the Developer Previews or if you’re just not sure you’re ready to run OS X 10.9 full time yet.
You don’t need another hard drive to be able to do this, instead you utilize unused space on the existing drive to create a new partition that runs the alternate OS. This process can be completed from a Mavericks boot drive if desired, and using such an USB installer tends to prevent any potential errors with Disk Utility (more on common errors you may encounter at the very bottom of this article), but it is not necessary.
Be sure to back up the Mac before modifying the partition table, the easiest way to do that is by starting Time Machine immediately rather than waiting for the scheduled backup to take place. Let that complete before beginning.
Partitioning & Installing OS X Mavericks for a Dual Boot Mac
- Launch Disk Utility, from /Applications/Utilities/
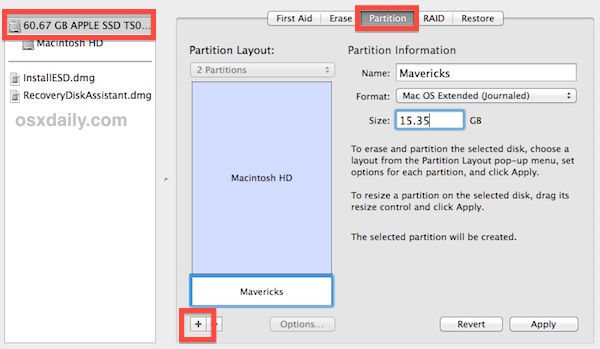
- Select the hard drive from the left side menu, then choose the “Partition” tab
- Click the [+] plus button to add a new partition, size it to at least 12GB and name it something logical, like “Mavericks”, then click “Apply”
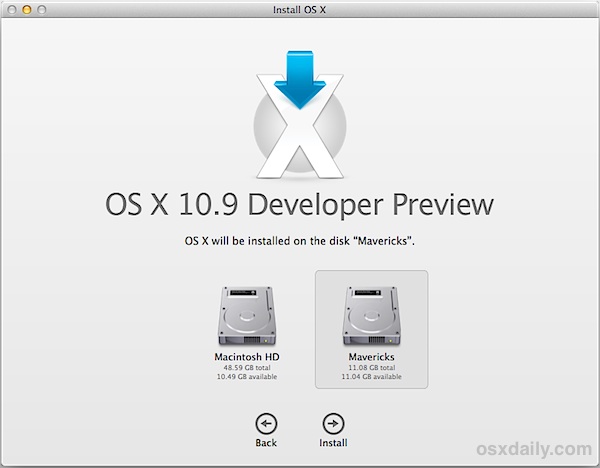
- Quit out of Disk Utility when finished, then launch the “Install OS X 10.9” app from the /Applications/ folder
- At the installation menu, choose the “Mavericks” partition you created as the destination drive, then choose Install (you may need to click “Show All Disks” for the partition to show up)


OS X Mavericks will install and, when finished, will boot directly into 10.9.
To switch booting between OS X versions, restart the Mac and hold down the Option key, then choose whichever partition you wish to start up from. You’ll notice the initial boot menu does not display the OS X version, which is why it’s important to name the partitions something fairly explanatory, like “Mavericks”. You can also change the boot disk by going to “Startup Disk” within System Preferences and selecting the OS X partition to use, the preference panel option will display the OS X versions for each partition.
The whole process should run trouble free, but if Disk Utility throws an error it’ll probably be either ”Couldn’t unmount disk” or a “Partition Failed” message, both will require a reboot and slightly different methods to resolve, and can be mitigated by using a USB install disk rather than attempting to partition from the active startup drive.


“Quit out of Disk Utility when finished, then launch the “Install OS X 10.9” app from the /Applications/ folder”
You don’t state how it gets to this folder. The only option I see is to install from the App Store.
When you download it from the App Store, the “Install OS X” app appears in the /Applications/ folder. You must do it before installing though, otherwise it will remove itself.
Nice posting, Thanks